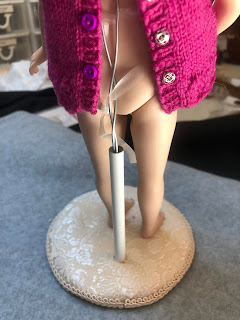
The method I describe here has worked well for very small to medium size dolls (like up to 18"). The only disadvantage of these stands is that you cannot pick up the doll just by the back piece like you can with a commercial stand. For that reason they are risky for competition unless you can make sure they will get lifted up by the base as well. This weakness could be rectified by a strong attachment mechanism, but for now this is good enough for my purposes. Please let me know if you improve on this part. The other advantage of these stands is that it is really easy to lift a completely costumed doll off the stand without messing up the costume. I find that quality really useful sometimes.
Base
Wooden circle. Thickness depending on doll. For the small dolls 4mm is enough, thicker for larger dolls. Sometime I can buy them cut but otherwise I cut them on a scroll saw. If cut on scroll saw it is important to sand to get a smooth circle. I use a stationary power sander for this.Hollow tubing. I found this at a railroad hobby store, but it is also on Amazon. The brass is the strongest, but aluminum is ok for small dolls and doesn't oxidize like brass. For larger dolls I found curtain rod works well. Cut the tubing with a hack saw, it is a lot easier if you put the tubing in a vise (i am lucky my hubbie has a complete workshop at my disposal.)
Drill hole the size of the exterior of the tubing. You want the tubing to fit snugly in the hole. It is better to cut the hole slightly smaller and then sand it to size if you can't get the right size.
The padding is optional, I use quilt bat of whatever felt I have around, but I think it really helps the feet stay put, especially if the legs are uneven which often happens with really small dolls.
For the cover fabric I use Heat and Bond, an iron on adhesive. You could just glue, but it's harder and messier!
I Trim the cover fabric to slightly larger than the center and sides.
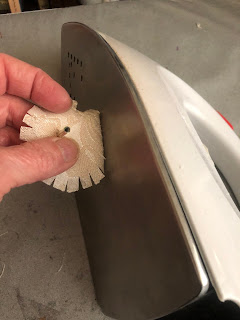
For the next step I lay the iron down and push the sides to the wood. I do this in starting on one side, then the opposite side, then the half, etc. It works better than trying to just go around.
Trim the sides, then I usually find there are some gaps so I do one last iron step.
Glue on trim and your base is done. Use a good amount for the trim because it comes off easily and ravels. Clean off oozy glue.
I used to do different trims but I am lazy now because this trim is easy and it goes with everything.
How to attach a Doll
Experiment with this part. I like the wire and elastic method but I have experimented with a crotch method, but it is tricky and the doll can fall off. Put a piece of wire into the tube and measure up about half way up the back of the doll. Bend the wire back to the base.
Cut elastic to fit around the doll and overlap about an inch. For larger dolls regular elastic is best. For small dolls I have recently tried this clear elastic which is thin but strong, and it works well.
Sew the elastic overlap so that each wire goes through it's own channel. If you don't do this your doll will pivot and you won't be happy!
Put elastic around doll, check placement in the tube, and adjust length of needed. I usually bend the top to fit the curve of the back.
You can tape the two parts of the wire together for easier insertion into the tube.
I like the thin elastic now because I can temporarily just tie it around until I have dressed the dolls dressed. Here are a couple ladies awaiting their wigs and clothes.
Sometimes you can get away without the elastic and just put the wire up the back of the dress, but the danger in this is you forget and lift it up and then you cry!!!! So don't be lazy like I am sometimes!
For a larger doll I use the curtain rod. It is steel and stronger. Here is a 10" unfinished doll on one. The elastic is temporary, because she is larger I will use the regular elastic for the final version.
Hope this leads you to make some of your own stands.


No comments:
Post a Comment