Saturday, March 21, 2020

Custom Doll Stands

Some people have expressed interest in how I make my dolls stands.  I have tried all sorts of things to make stands, and some work better than others.  Commercial stands work great, but not when they interfere with the costume.   I resorted to making my own because I did not like the distortion to costumes caused by commercial stands, and I live two and a half hour drive from my doll teacher's studio so I can't always buy one even if I wanted to.

The method I describe here has worked well for very small to medium size dolls (like up to 18").  The only disadvantage of these stands is that you cannot pick up the doll just by the back piece like you can with a commercial stand.  For that reason they are risky for competition unless you can make sure they will get lifted up by the base as well.  This weakness could be rectified by a strong attachment mechanism, but for now this is good enough for my purposes.  Please let me know if you improve on this part.  The other advantage of these stands is that it is really easy to lift a completely costumed doll off the stand without messing up the costume.  I find that quality really useful sometimes.

Base
Wooden circle.  Thickness depending on doll.  For the small dolls 4mm is enough, thicker for larger dolls. Sometime I can buy them cut but otherwise I cut them on a scroll saw. If cut on scroll saw it is important to sand to get a smooth circle. I use a stationary power sander for this.


Hollow tubing.  I found this at a railroad hobby store, but it is also on Amazon.  The brass is the strongest, but aluminum is ok for small dolls and doesn't oxidize like brass.  For larger dolls I found curtain rod works well. Cut the tubing with a hack saw, it is a lot easier if you put the tubing in a vise (i am lucky my hubbie has a complete workshop at my disposal.)
Drill hole the size of the exterior of the tubing.  You want the tubing to fit snugly in the hole.  It is better to cut the hole slightly smaller and then sand it to size if you can't get the right size.
The padding is optional, I use quilt bat of whatever felt I have around, but I think it really helps the feet stay put, especially if the legs are uneven which often happens with really small dolls.

For the cover fabric I use Heat and Bond, an iron on adhesive.  You could just glue, but it's harder and messier!

I Trim the cover fabric to slightly larger than the center and sides. 

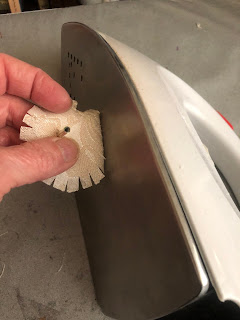
For the next step I lay the iron down and push the sides to the wood.  I do this in starting on one side, then the opposite side, then the half, etc.  It works better than trying to just go around.


Trim the sides, then I usually find there are some gaps so I do one last iron step.

Glue on trim and your base is done.  Use a good amount for the trim because it comes off easily and ravels.  Clean off oozy glue.
I used to do different trims but I am lazy now because this trim is easy and it goes with everything. 

How to attach a Doll
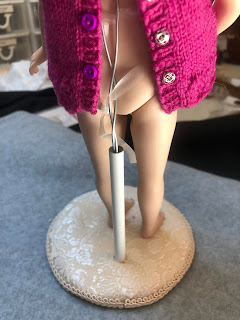
Experiment with this part.  I like the wire and elastic method but I have experimented with a crotch method, but it is tricky and the doll can fall off. Put a piece of wire into the tube and measure up about half way up the back of the doll.  Bend the wire back to the base. 
 Cut elastic to fit around the doll and overlap about an inch. For larger dolls regular elastic is best.  For small dolls I have recently tried this clear elastic which is thin but strong, and it works well.  

Sew the elastic overlap so that each wire goes through it's own channel.  If you don't do this your doll will pivot and you won't be happy!
Put elastic around doll, check placement in the tube, and adjust length of needed.  I usually bend the top to fit the curve of the back. 
You can tape the two parts of the wire together for easier insertion into the tube.  


I like the thin elastic now because I can temporarily just tie it around until I have dressed the dolls  dressed.  Here are a couple ladies awaiting their wigs and clothes.


Sometimes you can get away without the elastic and just put the wire up the back of the dress, but the danger in this is you forget and lift it up and then you cry!!!! So don't be lazy like I am sometimes!

For a larger doll I use the curtain rod.  It is steel and stronger.  Here is a 10" unfinished doll on one. The elastic is temporary, because she is larger I will use the regular elastic for the final version. 

Hope this leads you to make some of your own stands.  


Sunday, January 26, 2020

"Emika" my little Blossoming Flower Doll


I was able to attend the Doll Artisan Guild Convention in Annapolis Maryland.  I started out planning to enter one doll, but then decided I had another almost finished so she came too.
There were about 150 people attending the convention, and it was so much fun to be surrounded by people who have the same passion.
Here is a picture of Emika, which means "Blossoming Flower" in Japanese, and one of the most popular recent girl's names there.  Her mold was from a doll sculpted by Dianna Effner.  She was a model for one of my smocking workshops, and she is very petite and her expression is "museful" (is that a word!).

April's dress is smocked on Imperial Batitse.  Her hat was formed on a mold I made from a bowl, then embroidered.
Her slip is very fine cotton batiste.
And she has a very green pair of shoes, with ruffled socks to complete her outfit. 


Tuesday, October 3, 2017

London Doll Convention

I have attended the Doll Artisan Guild Convention in the United States for the past three years and thoroughly enjoyed being immersed with so many kindred souls of the doll world.  When I saw that there was a convention this year in London, England, I decided to try to meet some dollmakers from across the pond.
The convention was held in Blackheath, which used to be a small village outside London, but is now part of London.  The charming Clarendon Hotel looks over the heath, an immense grassy area used for various village functions such as concerts and sports.  I wondered why it was so large, and later learned that it was where victims of the black death were buried during the middle ages.  It is a mass grave, so no building on it is allowed. 

Dollmakers from 12 countries were in attendance.  At the convention there were workshops, awards dinners, a sales room, and a bevy of dollmakers thrilled to meet others who share this absorbing (to us!) hobby.

I entered a small French Fashion doll which I called "Cerise" because of her red dress.  I was down to the wire getting her ready and swore I would start earlier next year.  The competition is criterion based, meaning that if your doll achieves a certain standard it gets that ribbon.  I was pleased to get a blue ribbon, the top ribbon for the general judging.  All the blue ribbon dolls in a category are then grouped, and the best one gets what is called a rosette.  I did not get a rosette this year, but was very pleased to get the blue ribbon.  The rosette dolls in this category were wonderful.  Here is my little "Cerise" in her red and black dress made of silk chiffon I purchased in Paris last year.  It was quite a challenge to sew, but has such lovely drape.  It was very expensive so I only bought a half yard, and I was down to the last inch when I finished. 
One of the other activities at the convention is the awarding of titles that people earn through the credentialing system.  I was thrilled to get my "Masters of Dollmaking" which I have been working on for over a year.  
Here I am getting my Master's with Competition Director and fantastic dollmaker Femme from The Netherlands on the right, and my friend Sue from New York on the left.  I think I was more excited about getting this Master's than my M.Ed.!

Here are a few more glimpses of the dolls.


Saturday, April 30, 2016

Bobbin Lace and Turning a Corner

I don't really remember when I learned that there was a craft / art called "bobbin Lace", but it was probably somewhere in the early seventies  when I acquired and devoured the thick tome The Complete Encyclopedia of Needlework by Th. de Dillmont .    Although fascinated by the lovely engravings in the encyclopedia, I never actually knew anyone who could do this amazing work.  I filed this away as something I might like to try later.
Madrid, Spain
Eventually a few inspirational moments spurred me on to learn.  The first was a visit to Nerja, in the south of Spain, where a chance drop in to the local senior's centre found an exhibit of lace made by a local group.  It was very well made, delicate, and impressive. On the same trip while exploring the streets of Madrid I happened on a merceria with a window display of bobbin lace, pillow, and bobbins.  It was night and the store was closed, but I beetled back there as soon as I could the next day.  After waiting in line and going up to the counter to order by number, I was totally mystified as to what I really needed to do the lace, so with some advice from the clerk I settled on some very pretty carved bobbins and some lace thread. In my crafting history the danger zone is when you can get the stuff needed...
After coming home from that trip I looked at the encyclopedia again, found another book, and actually made a couple bookmarks after a few failures.  But bobbin lace is challenging and I gave up further attempts.
My next trip was to France, but since the route was through Amsterdam I decided a trip to Bruges would be a good quest to find lace.  Bruges is magical, and after roaming around and seeing lace in all the tourist haunts, I finally got directions to the lace school, which was off the beaten track from the main centre of town.  I was lucky enough to be there on an afternoon when the skilled ladies came to demonstrate.  It was fascinating.  Many of the ladies were well into their 80's and older.  Their hands moved so fast you could barely see the bobbins.


The final hook was meeting a friend who does beautiful bobbin lace and offered to teach me. Although I have learned many needle arts from books, bobbin lace really requires a teacher, especially at the beginning.  So Cindy showed me some examples of the different types of lace, and we settled on a beginner Buck's point pattern.  With Cindy helping me at almost every step I was able to make a homely little bookmark, but by the end of that I at least understood the stitches.  After that I was hooked, and managed to find several books thanks to ABE books and the internet.
Here is a picture of my first piece of lace that I am happy with.  The tension is good, I was able to do the footside, and do three types of motifs.  After trying to learn more from books and Cindy's help, I eventually found an excellent set of self teaching progressive lessons for purchase at this website:
Lynx Lace
Following these lessons in detail really helped me understand all the moves better.  The next project literally showed me how to turn a corner!
Both of these used Lizbeth 40 crochet thread, and it works fairly well.

That's all for now, I will post my further projects when I learn how to do them.  

Wednesday, December 26, 2012

Tiny Lace Knitted Dress

One of the challenges in knitting doll clothes is finding the right yarn and getting the gauge in a pattern.  Because of this I decided I needed to start making charted patterns that would enable me to get the size needed in any yarn.  After knitting several doll patterns, I now realize that it is not really too difficult to draft my own pattern after making a swatch to get the gauge in a particular yarn. 
The picture above shows the skirt of my latest attempt.  Fort he edge I used a couple rows of garter stitch, then headed into my lace pattern with the main colour yarn.  If you want a full skirt it is best to block the skirt before knitting the bodice in order to get the best scallops etc.  You could used waste yarn for thie step, but I am finding that I can just leave the piece on the needle.  The skirt of the first dress I made came out a little too straight, so I tried another one after recalculating and getting a little more serious about my math.
The next dress had a better skirt, and I also tried knitting a couple little sleeves first, then adding them when I made the straps for the arm holes.  This technique worked very well.  This doll is a Bru reproduction I made, and is about 3" tall.  The yarn I used was Debbie Bliss Rialto Lace.  The scle of this yarnis great for small dolls, so I plan to use it as a staple weight, hence my scaling will be useful for other pattern I develop.  I have written out this pattern but want to test it again.  Writing patterns is a slow process for a newbie designer.


Betsy is starting to get dressed.....

I'm still on a knitting streak, so here is my latest.  Betsy McCall was originally made as a small doll of about 8".  Then in the 90's I think Robert Tonner recreated her in a 14" version.  She is a beautifully made vinyl doll, but is now only available through the secondary market such as private sales or eBay.  I had one of the small Betsy's when I was a child, and she was by far my favourite doll.  I don't know what happened to my original Betsy, but I have collected a couple of each size now.  This one came in her original little onsie, so she needs clothes.  The pattern was a top down sweater from an Etsy vendor, St. Raphael's Women's cooperative.  The pattern is easy to follow although not written in the easiest to use style.  The lace pattern is easy once you understand how to do yarn overs when you are also switching from knit to pearl.
Anyway, this basic sweater is very cute, could be easily adapted to other lace or fair isle patterns, and a quick project.  This was knit with softee baby yarn, a sports weight acrylic.
Sorry the Etsy store with the pattern is closed for Christmas, so I'll post a link when it opens again.

Sunday, November 4, 2012

This Poor Girl Needs Clothes!

"Elspeth" is a reproduction of a doll by German dollmaker Gebruder Heubach.  She is one of my favourite dolls, with such a sweet little face.  She is about 7.5 inches tall and has an all porcelain body.  I am knitting her an outfit in blue lace weight yarn to match her hair bows.
 I costumed another one of these dolls for my mum's 80th birthday, and put her in a box. That's a picture of me on the left when I was a baby!